Tuesday 31 May 2016

Gummi Madness...

Evening Lovelies,

Tonight I thought I would bring you up to date with my latest (and thus far most enjoyable) polymer clay project.

Let me start out, however, by letting you know that I, being closer to 30 than 20, am one of the biggest Disney fans, and no, I am not exaggerating... 
From my beautiful Mom I inherited many things, one of them being the love for all things animated (well mostly kids movies), and where better to get amazing animation with great characters and happy endings than from the amazing Walt Disney?

Now don't get me wrong, I love DreamWorks and MGM and 20th Century Fox Studios too (I'm sure I missed a fair few, but I'm sure you'll understand), like I said, animated kids movies, but for the purposes of this particular night, I think it's best to stay focused on Disney only.

I have loved Disney since I was a kid; and I can remember watching movies like Beauty and the Beast as a little girl and being enchanted by the magic of it all. I cried in The Lion King when Simba loses his father; and crossed my fingers, hoping that Baloo would be okay in The Jungle Book
Now, as an adult with over a 100 Disney DVDs (and keeping in mind that for the moment I only have fur-kids), I can assure you that I am well versed in Disney animation 
(and even some of the live-action ones too), and I love it all; watching most of them over and over, driving my poor hubby insane (and Mom and the Boys before this). But again I am getting off topic.

My most recently re-awoken obsession is with (in case you couldn't tell from the title) none other than The Adventure's of the Gummi Bears.
I love them, and have ever since forever. 
(You can see where I'm going with this, can't you?)

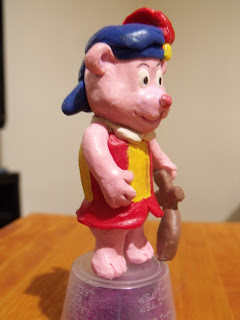
Ladies and Gentlemen of the Internet, I give you (my impression) of Cubbi Gummi! (Made out of polymer clay and a few dabs of acrylic paint.)


I know that he is far from perfect, but I think I did pretty well. Some of the finer details (like the lighter shading of his muzzle seems to get lost in the photos, but you get the idea...

Here is an original:

I got this off of the internet and used it as a bit of a reference (that and about a thousand hours of Gummi watching), but I found that, due to the fact that the Gummi Bears first aired in the 80's, all of the episodes etc. are hand drawn. 
That, of course, means that there is none of that amazing 3D rendering computer programmers working their magic on the Bears. So, even though by watching the Gummi Bears a few times more than is strictly necessary, one can only try and make an educated guess as to what they look like in a 3D rendering. I am sure that there are some that would not agree with my impression of the youngest of the Glenn Gummi's, but never mind.

Here are a few photos from a few different angles:


My intention, in the long run, is to make all six of the Glenn Gummi's, and perhaps even (at some stage) Gusto, and that is why Cubbi is currently standing on an overturned medicine cup. 
Once I have more Gummi's I will be better equipped to make/find a suitable base for them to 'live' on. I'd rather not fall in love with a certain stand only to find that it is unsuitable to house all six (maybe seven if I include Gusto) of my Gummi's.

The reason I started with this particular little guy is not, as you may rightly think, because he is my favorite (that would probably be a tie between Tummi and Zummi), but rather because he is just that, the smallest of the Gummi's, meaning that I now have a reference to work off of and I will most likely make them in that order: from smallest to biggest. (Starting with Cubbi, then: Sunni, Gruffi, Gusto, Grammi (Grammi and Gusto are about the same size). Followed by Zummi and finally Tummi.)
I didn't want to risk starting with a random Gummi, or even the biggest/tallest, which would be Tummi, just because I didn't want to risk having to work in a scale that I am uncomfortable with ie when I get around to making the smaller bears they might have been too small to be worked comfortably. As it is this little guy is only about 8cm tall, and I found the scale to be just about as small as I dare to go without making life extremely difficult/losing the finer details.

And so next on the agenda would be Sunni Gummi. 
I would say to you, if you, are a Disney or even just a Gummi Bear fan: Watch this space, because the rest of the bears are coming... (Probably, if you know me, you know that I am easily distracted and almost just as easily bored.)

With that I think that I shall say goodnight to you.

Until next time,
ACL.

PS. Sorry about not having any WIP pics. I was having way too much fun to even think about stopping and documenting the journey, but I promise to be more diligent with my camera when it comes to Sunni.

Sunday 29 May 2016

A scarf for Dad...

Hello beautiful people...

Well here we are again; another day, another post, another project. 

I know that I shared some faces and thoughts on a project that I was working on, but the sad truth is that the mushroom fairy project has been put on hold for the time being, indefinitely.  I had one too many challenges with getting the body to come 'to life'. 
In the end (when her shin was almost as long as her upper leg and torso put together,) I gave it up. I had redone the legs so many times, baking her over and over, that she seemed to have a really bad tan (where the clay started to burn/scorch, regardless of the fact that I had covered it) something that I have never been able to recover from. 

I will most likely pick the project up at some point in the future, as I really love the whole idea (layout etc), but I daresay that, for the moment, it is going to stay on the 'to do' list.

And so, not for the first time, I have very little to show for today, so I thought that I could share with you a project that I completed a fair while ago...

Once upon a time... 

No, not really. Some time ago however, Dad thought he would challenge me with a project that he didn't think I would be able to do. Well that was the impression that I got, and I have a stubborn streak in me second to none, so what else could I do but accept? 

He wanted me to knit him "a scarf or something with the company logo on it, if you can." I did.


Here is the actual logo:

I will admit that I faced a bit of a challenge, as at the time I had never before knitted with multiple colours at the same time; and, naturally, I had no set pattern to work off of, well not until I made/wrote one...

I started out by copying the design onto a few sheets of graph paper. Once I was satisfied with the result (that is to say after a fair few attempts - and a few choice words), I found that for the design to look good, I had to eliminate some of the finer branches and smooth out some of the other details, a knitted design would just not accommodate some of the finer details. 

In the end the pattern looked something like this:


Then it was simply a matter of consulting my well stocked bookshelves for the correct knitting books, one that would guide me in mastering knitting with the multiple coloured yarns at the same time...

In the end I think that it turned out rather well, and I love the contrast of the blue and the gray, but I'll admit that if I were to make it again I will definitely make a few changes (not that I am intending to make another any time soon).


In case you were wondering, yes! I am working on a few things, including my triple blanket, I pulled it out again a few days ago. 
(This is an old photo, just because I am a little too lazy to take some new ones tonight.)


I have also just started another polymer clay project that I am really excited about, but for now I will keep it to myself.

And so lovely ones, 

Until next time,
ACL.

Monday 23 May 2016

The Armor of God...

Okay, so if you couldn't tell form the title, this post will have some (a lot) of religious content.

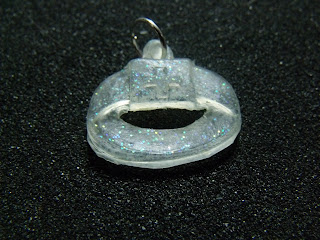
Once upon a time Mom bought me a bag charm/key chain that represented the Armor of God, unfortunately however, they quickly tarnished. So to save them from complete ruin, I took them off my bag and just hung them up on the key-hook in the lounge where I sort-of forgot about them. Mom however lost hers and has been unable to replace it. 
For those of you who don't know what that is, here is the bible passage it comes from:

These were the first, made from polymer clay.


(King James Version)
Ephesians 6:10-18: 
(10) Finally, my brethren, be strong in the Lord, and in the power of his might. (11) Put on the whole armor of God, that ye may be able to stand against the wiles of the devil. (12) For we wrestle not against flesh and blood, but against principalities, against powers, against the rulers of the darkness of this world, against spiritual wickedness in high places. (13) Wherefore take unto you the whole armor of God, that ye may be able to withstand in the evil day, and having done all, to stand. (14) Stand therefore, having your loins girt about with truth, and having on the breastplate of righteousness; (15) And your feet shod with the preparation of the gospel of peace; (16) Above all, taking the shield of faith, wherewith ye shall be able to quench all the fiery darts of the wicked. (17) And take the helmet of salvation, and the sword of the Spirit, which is the word of God: (18) Praying always with all prayer and supplication in the Spirit, and watching thereunto with all perseverance and supplication for all saints;

So I have put the particular parts of armor in italics, but as you all know, a picture speaks a thousand words, so without further ado, here they are:


Two of the sets are made from casting resin that has been tinted, and the last of them made from polymer clay.

All things considered I think that they turned out rather well. Here is a close up of the individual pieces...


The Helmet of Salvation.

The Breastplate of Righteousness.

The Shield of Faith.


The Sword of The Spirit.


Belt of Truth (to gird your loins).


Shoes of  Peace.


And finally: Prayer (represented by an open bible).


Well that is that for today.

Until next time,
ACL.

Saturday 21 May 2016

Catching Up...

I was just thinking that I should give you a quick update on what I am doing, just so that you know that I haven't forgotten about you, nor have I been idle since my last post...

At the moment I have a few things running around in my head that are just begging to be brought into reality (most of them are viable, the rest are best left as ideas only...). 
Those of you who know the feeling, will know that having that many ideas vying for attention makes it really hard to, not only focus on a particular project, but also to stay focused when working on something. So the long and the short of it is that I have three, semi realized, works in progress, two of which I thought I'd share tonight.

The one is just another face (for now). The face is about the same size as all of the others that I have done to date, so to fit an armature of about 7 inches. 
At the end of this project I want her to be looking into (perhaps even playing with the water in) a 'reflection pool' in the shape of half a clam shell, an idea inspired by watching LOTR for the thousand-th time.
Well that is the picture I have in my head at the moment, but, for those of you who know me, you'll know that it is subject to change without warning/notice. 
Sometimes the clay "speaks" to me and a new direction is embraced without much input/effort from me (and no, I am not all  that crazy!).


I started sculpting her because I was making smaller eyes (I'll get to that in just a moment) and they needed time to cure etc. before I could use them. Just to keep myself from getting impatient and  using the small eyes before they were ready and possibly destroying them in the process, I made this face... 
(Unfortunately for me I already had to make them (the eyes) twice as the first batch of small eyes that I made were just a disaster. I'm not really too sure where I went wrong, but boy, did I go wrong. But never mind.)

Next I have an idea for a pair of fairies. The idea is that one is sitting on a tall mushroom and the other is getting a hand up towards the seated one. 
I have decided to make these about half the size of my usual ones, the armature being 4 instead of 7 inches. Of course the bulk of the clay being baked onto the wire frame obviously increases the size slightly. (This is where the smaller eyes come in, as naturally, I couldn't use the bigger ones that I had made previously because they would be twice the size required, and I have already been told that I tend to make faces that are too wide eyed.)

Now I must warn you that the following photos are not all that pretty, but I need you to keep in mind that these are WIP (work in progress) pics only.

 Just a head. 


To give you an idea of the size difference that I mentioned before. The one on the left is the "normal" size, and the one with the blue eyes is the smaller one.
Here she has become a bit more than just a head.

The body DEFINITELY needs a lot of work. Patience is the key here, as, on this scale, I am going really slowly - more so than I usually do (I'm not sure I like working this small, hence my hesitation in starting the process of making the second one)...
A different angle. (The idea is the she will eventually be looking up towards the other fairy that is already on the mushroom, but for now it just looks like she has some serious neck issues.)
(This one is for those of you who wondered how I bake them.) 
Laying the unbaked clay flat in a dish or other tray will cause the clay to have a flat spot (because as the clay heats up it softens and becomes a bit liquefied, creating a melting effect on to the surface of the what ever it is,) and not really in a way that is easily remedied (again - speaking from experience). 
To avoid this I generally try and either hang them (like this) or have them standing (if at all possible), and not just the figurines, but the same goes for anything that shouldn't have a flat spot.

Here she is on her stand, having gained a bit more leg.
 From the back
 On the side.

 And the last angle.


Now you might have noticed that she has some seriously un-smooth skin, among other issues (did you see that one shoulder?! Poor thing,) but all of these should be fixed in the next few days as she is, um, fleshed out... (Pause for effect.)
She will also, most likely, undergo some serious boob reduction and thigh shaping before she will be done...


Another size comparison.

I'm sure that by now (if you are still reading) you are pretty much all 'fun-ed' out, so I'll be quick. 

As you know the small figurine will be a fairy, and, of course, fairies need wings. Here's what I have so far. I think they are looking pretty good, but they are also very much still a WIP.

(I might, at some point in a later post, go into more details on how I made these, but for now a picture should do.)


And so, dear Internet User, we come to the end of another post and it's time for me to say...

Until next time,
ACL.


Monday 16 May 2016

The Wild Rose

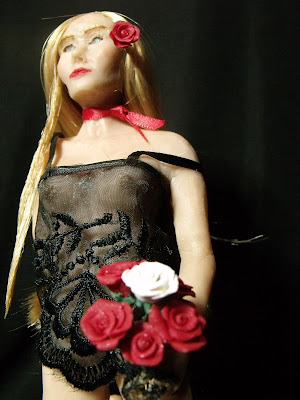
Allow me to 'introduce' you to the latest completed creation from my craft room (a.k.a. the lounge), its a piece entitled 'The Wild Rose'. It was, in part, inspired by one of my favorite songs by Nick Cave and the Bad Seeds. Its called "Where The Wild Roses Grow" (here is the YouTube link, in case you are curious/interested - https://www.youtube.com/watch?v=lDpnjE1LUvE).


I didn't really do anything in the creation of this piece that I haven't done before, so I won't bore you with all the boring WIP photos...


The eyelashes that I used this time were, instead of individual hairs/false (people) lashes, I purchased some actual doll's lashes. The difference that it makes is rather awesome.You can find them from this site: http://www.ooakartistemporium.com/index.html . (Please note that I am recommending this lady not because she asked/payed me to, but because I have used her services myself, and found her to be awesomely helpful and her prices are very reasonable.)


The feet are probably my favorite part of this sculpture; not because I have a thing for feet (in fact they tend to give me the creeps in general), but because I think that they look so good. I love the detail.


The roses that I used here are the same ones that I made in my previous post. Here's a link to it: http://whatsannadoingtoday.blogspot.com.au/2016/05/polymer-roses.html


And that's that. I would love to know what you think...

Until next time,
ACL.


Thursday 12 May 2016

Polymer roses...

At the moment (okay, I've been working on it for a while now) I am working on the last of the sculpting of a new creation, and so: this will be a very quick one. 

I am hoping to use these roses as a sort of a prop in my latest sculpture, but I thought that because these are not like anything that I have shared before (unlike the sculptures), I'll do so now.


I knew that I wanted to have roses in this new piece, but, initially, I was going to try and use ribbon roses and spent the better part of the day trying different techniques to make them.

I even pulled out some of my embroidery books and had a look in there, but for what ever reason, it was just not looking the way I would have liked it to, so although I managed to make these ribbon roses, and they looked pretty good on their own, I had a really hard time putting them on 'stems'. 
In the end, I decided to make them out of clay instead, and to be perfectly honest, I think that it might have been a really good thing as I doubt that I could have achieved the same results with the ribbon. 

This is a handful of the ribbon ones...


Here's how I did it with the polymer clay...

I started with a rolled snake of the red-blend (red mixed with a bit of mauve and some burnt sienna,) that I wanted these roses to be. 
Next I cut the snake into small-ish slices. A quick note: if these are too thin it makes working with them rather difficult, and, if they are too thick, the petals tend to look a little fat. I would suggest playing with the thickness of these slices to find one that works for you.


I started the flower with a bit of clay baked on the tip of my stem which will serve as an anchor to the petals.

I used floral wire (painted green) as a stem for my flowers. The wire not only looks pretty good as a stem, but it also provides a nice 'handle' that makes it easier to work with the flower and not squish it. Another benefit of the wire is that it can be manipulated to have a few bends and twists etc. in it, again giving the flowers a bit more of a realistic look.


Remember those slices? Well I took them one at a time and flattened them in between my fingers until they were almost paper thin (the thinner you can get them, the more realistic the end result). 
I found that as well as the thickness the shape is also rather important in obtaining a realistic looking rose. As always it might be a good idea to have some sort of reference on hand (either a real rose, or even just a picture of a rose and some individual petals). As you might be able to tell, my slice is no longer perfectly circular.


Once I am happy with the petal, I gently roll it around the pre-prepared stem. Next I carefully fold the top of the petal down just a little, effectively opening the bud. I must caution you: go gently because it is really easy to spoil them.

Now I simply continue adding petals until the rose is the size that I want it to be. 

Some baking ensures that all of this stays perfect before we move on to the next bit.

It isn't really needed, but for added strength I just add a little drop of TLS (Translucent Liquid Sculpey) to the base of the completed rose just before baking.


 Now on to the base of the flower.

Here I just made a little disc, similar to the ones I used for the petals and put it onto the stem.


A bit of shaping.

A bit of cutting.
Some more shaping and cutting, curling some of the green away from the red.

I find that if the cuts are too 'clean' the flowers start looking less and less realistic again. If the clay is sort of 'torn' rather than cut perfectly straight the result it much more satisfactory, that is if you are going for the more authentic look..
Adding a few bits and pieces (leaves and thorns) to the lower half of the stem.

Now off to a last bake in the oven, five minutes at 110 degrees Celsius should be more than enough for these guys.


And there you have it, six long stem roses. Perfect...


Now I am off to go and finish what I started, so:

Until next time,
ACL.

P.S. I just wanted to wish my Baby Brother the happiest of happy birthdays that has ever been had. I love you to the moon and back Bean. Always.
XOXO