I'm back again! Let's get right into it tonight. I will be referring to these as pancakes throughout this post, but I know that some of you might call them crapes instead.
Here's what mine look like:

When I was growing up, there was no greater treat than having pancakes on a cold day. We didn't have them with strawberries however, instead we had them with cinnamon sugar. In fact at Mom's house cold/rainy days are still referred to as "Pancake Weather".
Enough about that, lets get right into making these miniature versions...

I started with the pan. I cut a circle from a rather thick sheet of scrap clay and shaped it into a basic 'pan' shape. (For some reason my brain has gone completely blank...)
If you recall the baking tray that I made yesterday, you'll know how I achieved the sparkly black colour of the metal.

When the base of the pan was done, I sanded off the rough edges and rolled out a thin snake of the same black clay to become the handle.
This just takes a bit of flattening and shaping. I poked a hole in the top of the handle and added some silver "rivets" to add authenticity.


I love it, I think that it turned out pretty nicely.
Now the actual pancakes:
 To start off I punched out a stack of pancake coloured circles just slightly smaller than the base of the pan.


Here are a few just before baking.
For some reason I don't have a photo of it (corrupt files), but I highlighted the bubbles with a little bit of brown coloured acrylic paint.

I rolled two of the pancakes (because that is how we eat them) and stacked the rest of them, saving one for the pan.
Strawberries next.
 I have made two types of strawberries. I made whole ones and then I made slices.
Let's start with the whole ones.
I know it seems silly, but I used white clay and made a bunch of more or less equal slices which I then turned into little teardrop shapes.
 When the shape was as I wanted it to be, I used my needle tool to male little pricks all around the surface of my 'strawberry'.

For the leafy parts, I tool a thin scraping of green clay and attached it to the top of my strawberries.
Bake and set aside to cool. Once they were ready for it, I painted them red with acrylic paint.
This is where making them out of white clay comes in.
I don't like my strawberries to be over-ripe. That is to say that I like them to have just a tiny but of white left on the top (close to the leafy bits...), and to have this look in my miniature ones it seemed a lot more practical to make them fully white and pain them red than to make them red and try and add the white later.
 All things considered, I think that they turned out pretty well...
 Now the sliced ones turned out to be a little more complex to do.
I started out by making what is commonly referred to as a "skinner blend".
I know it looks and sounds scary, but it is actually really simple, and , contrary to popular internet consensus, not impossible to do free hand (that is to say without a pasta/clay machine).
You start out by placing the two colours that you want to blend together side by side (as pictured). It is often reccomended that you used squares and cut them on the diagonal.
 I found that you don't have to be so exact, so long as you have the right ratio.
For this one I want to have a slightly more red end result, so I used more of the red than the white clay.
Once you have the colours ready, roll them out to the desired thickness, I use a kebab stick on either side of my rolling-pin to keep the sheet and thickness consistent. Make sure that you roll the sheet out to the same thickness each time.
 Fold the sheet from top to bottom (or bottom to top, if you want) and make sure that you always fold the sheet in the same direction.
 Keep rolling and folding until you are happy with the blend.
 For the next part I rolled the sheet (from top to bottom) and, using my fingers, made it into a rough square shape.
I cut the ends off and saved them for later.
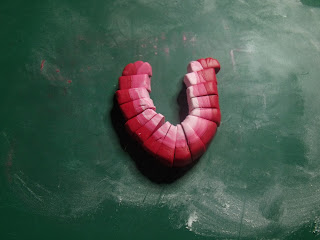 I bent the cane into a "U" shape to simulate the dissection of the berry and sliced it into about 16 almost equal pieces. Note how the slices in the curve of the "U" are more triangular than square.
(I lost the pics of the next part, but I'm sure you'll get it.)
In between each of these slices I placed a thin sheet of white clay, being careful to maintain the shape of my strawberry slice.
 For the heart of the fruit, I mixed some of the cuttings from before (the ends of the skinner blend) and translucent.
I mixed two lots: one darker and one lighter, but more of the lighter shade of pink than the darker one.)
 I filled in the "U" with first a thin sheet of the darker of the two pink blends, and finally with the pale pink I completed my strawberry slice.
 I reduced the cane ( trying my best to maintain the shape) and there you have it.
 The slices don't really look like much, but a bit of trimming and some detailing with my needle tool and my blade and they are good to go.

 I tried to make them slightly irregular sizes, but that is up to you.
Time to plate up!
 For the cream I used the TLS (Translucent Liquid Sculpey) mixed with some white clay (you could also use soft pastels or a bit of paint to colour the TLS, but beware that using too much acrylic paint is ill-advised as it contains water. The water evaporates during the baking process and can cause bubbles to appear in the end product).


That's that for another day. I hope that you have as much fun with these as I did.
Until next time,
ACL.

Let's start with the whole ones.
I know it seems silly, but I used white clay and made a bunch of more or less equal slices which I then turned into little teardrop shapes.


For the leafy parts, I tool a thin scraping of green clay and attached it to the top of my strawberries.
Bake and set aside to cool. Once they were ready for it, I painted them red with acrylic paint.
This is where making them out of white clay comes in.
I don't like my strawberries to be over-ripe. That is to say that I like them to have just a tiny but of white left on the top (close to the leafy bits...), and to have this look in my miniature ones it seemed a lot more practical to make them fully white and pain them red than to make them red and try and add the white later.


I started out by making what is commonly referred to as a "skinner blend".
I know it looks and sounds scary, but it is actually really simple, and , contrary to popular internet consensus, not impossible to do free hand (that is to say without a pasta/clay machine).
You start out by placing the two colours that you want to blend together side by side (as pictured). It is often reccomended that you used squares and cut them on the diagonal.

For this one I want to have a slightly more red end result, so I used more of the red than the white clay.
Once you have the colours ready, roll them out to the desired thickness, I use a kebab stick on either side of my rolling-pin to keep the sheet and thickness consistent. Make sure that you roll the sheet out to the same thickness each time.


I cut the ends off and saved them for later.

(I lost the pics of the next part, but I'm sure you'll get it.)
In between each of these slices I placed a thin sheet of white clay, being careful to maintain the shape of my strawberry slice.

I mixed two lots: one darker and one lighter, but more of the lighter shade of pink than the darker one.)


Time to plate up!


That's that for another day. I hope that you have as much fun with these as I did.
Until next time,
ACL.
No comments:
Post a Comment