I have been having the time of my life making all of these little things. I love trying to replicate the real life details in these miniatures and I feel like I get them pretty close (most of the time). Regardless of anyone else's take on the accuracy of my miniatures, I loved every second I spent making them. Here's what I've been up to these last few days:

I'll take you through them all, one set at a time, but to save you from losing interest, and me from losing my sanity, I think that I'll stick with showing you how I made them one "set" at a time. SO if you are keen on any one in particular, stay tuned as they will most likely all go up in the next few days.
Shall we start with my favorite? Very well, here goes:
"Baking Chocolate Chip Cookies"
There really isn't a specific place to start, and, in all honesty, I really cannot even remember where I started because I was working on all of the food stuff at the same time.
So to make things easier, let's just say that I started with the cookies.

I used a hole punch to cut out small, slightly domed circles.

Once I had roughly the right amount (or, more accurately, when I got bored) I flattened the 'cookies' and gave them some added texture with an old toothbrush.
For the chocolate chips I added the tiniest pieces of dark brown clay. I couldn't take any pictures of this process because my camera couldn't get a clear picture of the minuscule "chips". I had to apply these to the 'cookies with the tip of my needle tool, just to give you an indication of how small they were. after adding the chips, I baked my cookies... Well you know what I mean.
And that's that for the cookies. The baking tray next.

Another easy one.
I took a piece of wood and cut out a rough rectangle the size of the tray that I wanted.

I took some black clay and mixed in some silver with that to create a lovely sparkly black. Now I simply rolled out a thin sheet of the black, placed it over my template, smoothed out the corners. Trimmed off the excess and baked.
Once the baking tray was baked and cooled, I sanded off the rough edges and smoothed out any imperfections.
Once the baking tray was baked and cooled, I sanded off the rough edges and smoothed out any imperfections.
Once I was all done with that, I placed my cookies in the baking tray and secured them with a tiny drop of TLS (Translucent Liquid Sculpey) and baked for a final time. (I left one space open for the spatula. I wanted to create the illusion of already baked cookies being transferred from the tray to the plate.)

The spatula was made from another piece
of Balsa wood. I traced the shape of my utensil on the wood. When I was
satisfied with the size/shape etc., I cut it out and sanded the rough
edges.

Once everything was to my liking, I drilled a little hole in the
top of the handle to add to the authenticity of it. Sealed and glued
into place on the tray and we're ready to go.

The mixing bowl/dough/and spoon:


Bake and set aside to cool.

I started with a toothpick. One of the ones that has a decorative end rather than two pointy bits.


(A little tip when colouring TLS with clay rather than pastels or paint: leaving the clay in the TLS for a long period of time, +/- 24hrs,will make for an easier mixing process with less lumps.)

Once my 'dough' was in the bowl (I tired to simulate some of it having been scooped out to make cookies already) I put the spoon into the mixture.
I also smeared some of the dough on the spoon and on the outside of my mixing bowl (because that is what mine looks like when I make cookies).
When it was all to my liking I used the same method for putting chocolate chips on the cookies to put some in the dough.
The stone top and oven mitt:

All that I did to make this stone chopping board is use a bit of Sculpey's Premo Accents: Gray Granite and rolled out a thin sheet, cut to the right size and made tiny indents in the corners for the feet.
After it was baked and cooled I placed the 'feet' (a tiny ball of black clay) in the indents I made before baking and poked a hole into the center of the tiny balls of clay that are the feet. Baked again and sealed with a matte glaze.
After it was baked and cooled I placed the 'feet' (a tiny ball of black clay) in the indents I made before baking and poked a hole into the center of the tiny balls of clay that are the feet. Baked again and sealed with a matte glaze.

The oven mitt might look like it will be hard, but I assure you that it was pretty simple.
I look a piece of, in this case purple, clay and traced the rough shape of the mitt onto it.

All that is left to do now is round and smooth the edges, cut a gash in the bottom for the opening and add a few details.
Unfortunately I forgot to get photos of each step before the final product.
I also added a very thin strip of pink clay to give the impression of a bit of a trim finish.
I also added a very thin strip of pink clay to give the impression of a bit of a trim finish.
after the details are refined and the glove is baked and cooled I added a bit of detail with some acrylic paint and sealed it.
And finally the chocolate slab. Lovelies, I am eternally sorry, but I got absolutely no pictures of it. For some reason a whole lot of my photos were lost: "corrupted file". But like everything else that I have shared today, it is super simple. Simply cut a rectangle and, using a blunt edge (I use the back of my blade) make some indents in vertical and horizontal lines.
Unfortunately another casualty of the photo corruption was the plate. Again this is really simple.
A circle cut from a thin sheet of clay shaped and baked. Sanded and sealed and you are ready to plate up...
All that is left now is to put it all together!


Not too shabby, and really simple.
Well that is it for another day. I will most likely do another post tomorrow showing another of the foods that I made. (If there is a specific one that you would like me to do next, let me know.)
Until next time,
ACL.
PS. A very quick happy birthday to my beautiful sister-in-law. I hope that your day is everything that you hoped it would be. Much love. XOXO
PPS I have been using a new communications platform, and if you are interested in contacting me with questions and/ or comments, find me instantly (messages are sent to my phone) here:
PPS I have been using a new communications platform, and if you are interested in contacting me with questions and/ or comments, find me instantly (messages are sent to my phone) here:
https://reaches.me:8443/urlchat.html?guestid=6aa28459a91aad02692a9334f633919a
Its
a fairly unique platform with a huge range of uses, but I like the
chat. Alternatively, download it form the PlayStore. Search for
chatWORLD or follow this link: https://play.google.com/store/apps/details?id=com.world.chatworld&hl=en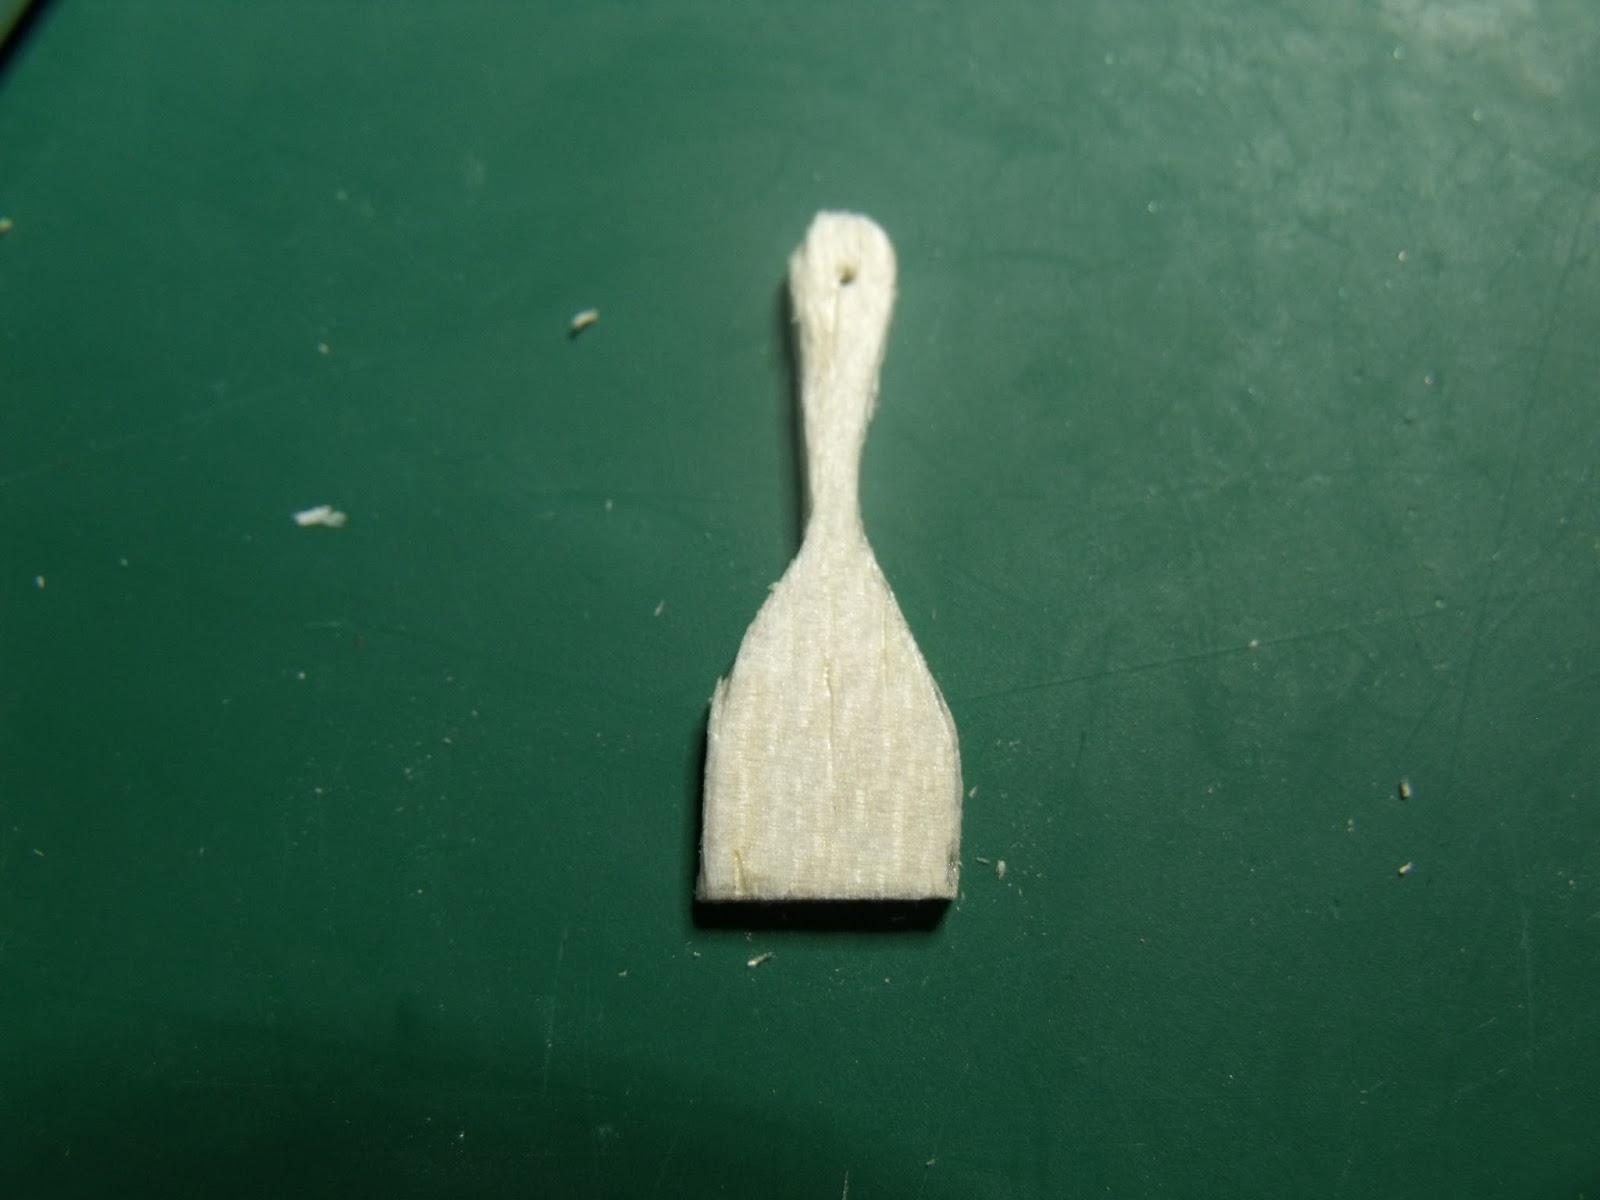
No comments:
Post a Comment