So yesterday we stopped at the legs, I think. Let's move on to the arms...
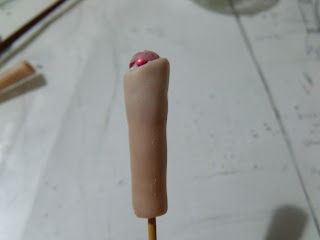
I started with the lower half of the arm. First I took my little arm bone from before and wrapped that in some fresh clay.
I added the bead that corrisponds to the elbow onto the top.
Another bit of clay wrapped around the bead. You can see the baby powder clearly here. It is really so much easier to remove the bead with it. I forgot in one of them and ended up having to re-do the entire piece (it was one of the shoulders).
The elbow "hole" is not just a straight cup shape as all of the previous ones have been.
This one is slanted at about a 45° angle.
The same piece, just from a different angle.
Here it is, baked and sans bead.
I would recommend making these one at a time so that you can have the baked one on hand to make the second. That way it is much easier to get them to look symmetrical.
The bottom of the arm is fitted in the same way with the wrist size bead, only this part has a straight edge again.
Okay, now for the upper arm.
Again I started with my little bone tube and wrapped that in clay. this time however I had the top of the arm solid, rather than with a hole straight through.
For the rounded part of the shoulder I made a little mould from the knee/shoulder sized bead (I simply pressed the glass bead into some raw clay, about half way in, and baked it).
I pressed some clay into the mould and then attached it to the rest of the arm.
Here you can see what I mean. This part is still solid for the time being.
I scooted the rounded part down a bit and shaped the upper arm a little.
Here I was just making sure that the shoulder does fit into the socket already in the breast/torso piece.
The shoulders are made in much the same way as the knees. Two beads joined together.
There they are. I added a little extra clay in much the same ways as I did for the knees and did a little bit of sculpting there.
To ensure that I didn't distort the work already done on the shoulder, I soft-baked this part (not in the oven, but with my embossing gun, this just hardens the outer layer of the clay, leaving the inside still soft, in this way I can work on the rest of it without distorting the derails already in place).
I know that the lower half of this still needs to be shaped for the elbow joint, so I left the arm quite short so that I could add more clay.
I just made a little starting hole for the elastic that I will later use a hand drill to complete.
For some reason I don't have picture of the rest of the arm process... (It seems that I need a new camera if I look at the amount of write errors and corrupted files the thing produces!)
Basically it is the same procedure as for the top of the lower half of the arm. The same 45-ish ° angle.
The hole I drilled until it met up with the vertical one. I also made a slit parallel to the arm around the hole (same as the hips).
Also don't forget about the slot for the elastic to move freely!
Before I can sculpt the hands and feet, I needed to do the head and face.
I will be honest here and tell you that I wad dreading this face, but it needed doing so "suck it up, Princess!"
First things first, in order for the head to be able to turn smoothly, I needed to have a rounded top on the neck.
So here it is, a little dome on the top of the neck. I used the mould for the shoulders here to make sure that the dome was perfectly rounded.
Bake and set aside to cool.
Before baking make sure that there is a hole!
Seeing as I want the head itself to be mostly hollow, I took a ball of tinfoil, not too densely compacted, roughly the size of the hole that I wanted inside the head..
Size it on the torso.
I made sure that the foil had a deep dent in it that corresponded with the top of the neck. Cover the foil in clay and bake so that I have a skull on which to work.
After baking and waiting for the skull, I wrapped the whole lot in another layer of clay. At this point I am not too concerned with the neck hole getting clay in it as it will be easy enough to remove just before I bake it.
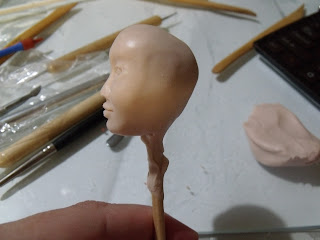
Shaping the clay...
Eye indents and a nose.
Once I have the length of the nose marked, I can use the rest of it for a mouth, but later.
I also added some extra clay for cheeks.
Drawing in the eyes and working on the finer derails of the face: defining the nose and mouth and smoothing all of the seems.
A look at her profile.
Hmmm. I think I'm happy with it.
Adding the first ear.
I find that it is only possible for me to sculpt the ears if I use good reference pictures.
I think that they turned out quite nicely.
Now for the second. Before I even start on the detail work, I make sure that the ears are properly aligned and symmetrical.
From the top.
From the back.
And then I follow the same process as I did with the first.
Once this is baked, then the fun starts...
That's it for today I think. Tomorrow I'll let you in on how I did the hands and feet and then the sanding and painting.
Until next time,
ACL
PS I have been using a new communications platform, and if you are interested in contacting me with questions and/ or comments, find me instantly (messages are sent to my phone) here:
https://reaches.me:8443/urlchat.html?guestid=6aa28459a91aad02692a9334f633919a
Its
a fairly unique platform with a huge range of uses, but I like the
chat. Alternatively, download it form the PlayStore. Search for
chatWORLD or follow this link: https://play.google.com/store/apps/details?id=com.world.chatworld&hl=en


No comments:
Post a Comment