I have finally found the time (and motivation) to finish telling you the story of little Amber.
I feel, however, that I need to clarify something:
For those of you who know me, you would know that my youngest sibling is one of my favorite people in the entire world. He has just graduated from high school, meaning that he is well into his 18th year. That being said, I still call him my "baby" brother, even though he is well past the conventional age of a baby. It is just the way I talk.
With that in mind, I would like to, quickly, assess the age of this little Mermaid 'baby'. Simply going off of her size and the proportions of her little body, I would say that she would be more accurately called a toddler, somewhere between the ages of 3 and 5 (it's hard to tell with Mermaids). I guess that would also explain why her hair is WAY longer than hair that you might typically see on a baby (although, again, mermaids might differ ;P).
So, in essence, I just wanted to thank all of you who have given me some lovely and constructive feedback, and I hope that this would ease any misgivings about my terming her a 'baby'.
Any way, enough with the boring, let's get to the fun part!!

This was where we left off the last time (http://whatsannadoingtoday.blogspot.com.au/2016/12/my-little-mer-pole-baby-mermaid-part-1.html), and so now it is time to move on to the little body.

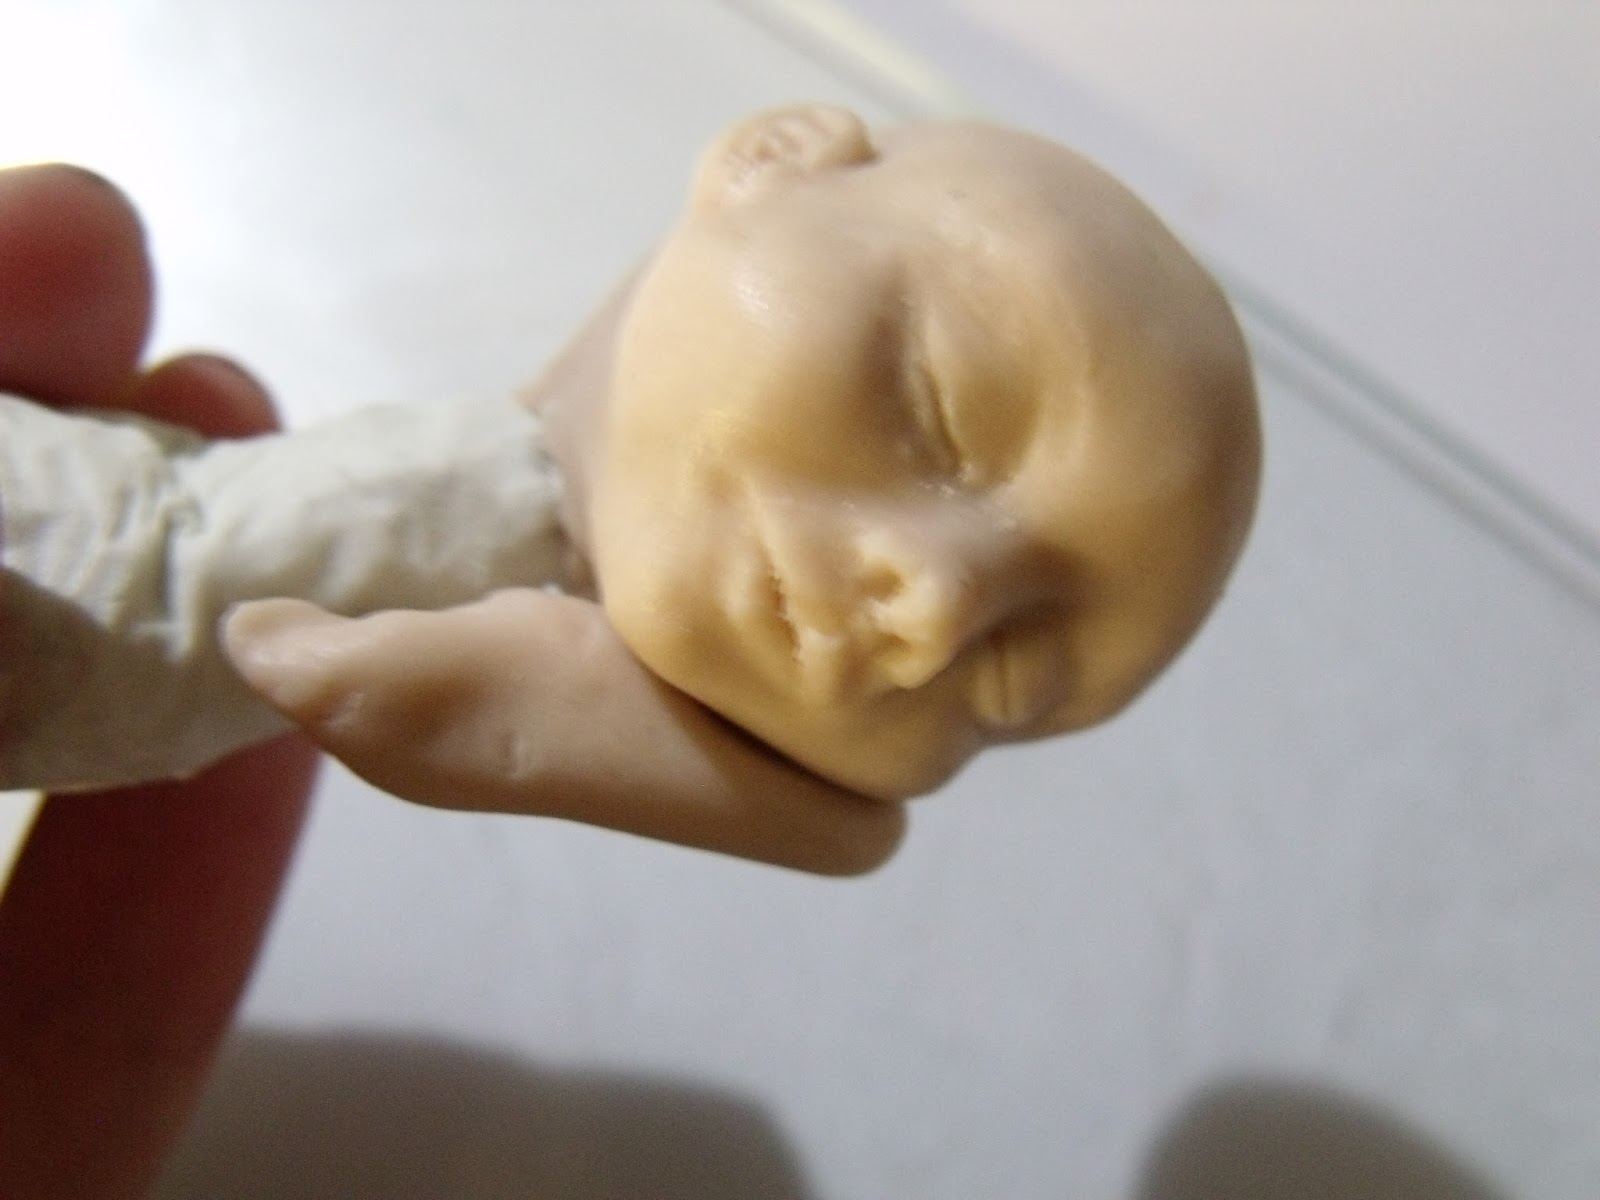
I really love this little face. It is just so cheeky.
Moving on.
I removed the extra bit of clay that was my stand-in hand and baked the head so that the features that I have worked so long/hard on won't get destroyed while I work on the rest of this little baby girl.
 When she was fully cooled, I painted the face with some baby oil (which is why it looks so shiny). I am not really sure what the technical reason or whatever is for doing this, all I know is that it seems to have a wonderful effect on the baked clay.
I find that if there are any small visible moonies (air bubbles baked into the clay) or tiny cracks etc. this helps sooth and 'fix' it somehow, or at leash lessen their appearance..
I know it sounds crazy, but for me it really works, and so I let the baked head 'rest' overnight with this generous coat of baby oil, and, in the morning, things are ready to go again!
The first sting was just to add some clay in rough general shapes to give her a little body.

Here you will see that I have some faux arms in place that I have yet to join onto and smooth into the rest of her. This way I can move the placement etc without having to ruin other parts of her. (I find that having temporary pieces like that helps me to keep better track of what it is that I am doing.)

Here I have added a bit more clay to the lower half of her.
For the tail I used some of my old/dirty clay because I knew that I would be paining it and so it didn't have to be pristine.
(I keep a ball of clay on hand that is made up of all of the cut away lint/dirt that always finds its way into the clay. I also roll this ball in my hands as well before I start, and every so often, while I am working. I find that this helps to minimize the amount of lint/dirt that ends up in my finished piece to some degree.)

Here she is from a different angle.

And from the top.
You might notice that the tail is a little differently positioned at this point and that is simply because I was completely unsure of what I wanted it to do and so I played around with different positions until I found something that I liked.

Once I was happy with the body, I added the little arms. Unfortunately for me my SD-card decided that it didn't like any of the photos that I had of that particular process, and so it corrupted them. Grrr...
At this point she is looking a little weird and a bit on the 'too chubby' side, but it would take me a few days (and a few choice words) before I came to realize what was wrong.

See what had happened is that, at one point, she was going to have a
little curved back with her 'knees' (or what ever it is that mermaids
have) pulled up to her chest, thus bowing up and out would occur along the
spine. Something that I neglected to correct when I changed her
position...)
Once I saw the problem, it was easy enough to cut away some of the excess clay and she looked adorable there after.

Here is another photo of that weird back, but in a different light.


After baking the body I noticed that she had cracked, quite badly in fact, and so I thought that I would leave that in here and show you how I deal with it.
It is NOT THE END OF THE WORLD (it only feels like it sometimes) !!
When this happens, I 'dust out' the crack first. I take a dry/clean paintbrush and just make sure that there aren't any loose bits of clay or anything in the crack.
I then take my TLS (Translucent Liquid Sculpey) and fill said crack generously.
The first few times I tried fixing breaks/ cracks like this, using the TLS, I was skeptical that it would work, but I was willing to try anything, as I felt I was at my wit's end.
I used the TLS so sparingly (I work on a budget and not only is TLS a tad expensive here in AUS, but 'wasting' is not really in my nature), but I soon realized that generous was definitely the way to go in these cases. A little simply doesn't cut it.

I neaten up the TLS with a paintbrush, and bake it with my heat/embossing gun (that way I can concentrate the heat just where I want it, and avoid having some of the thinner parts of the clay (the hands or ears) darken/burn when going back into the oven.

And there is the fixed neck! How easy is that, and you would never even know it was there!


NOW! This must have been one of my favorite parts of this project, the tail...
First the fins, then the paining.
In the past I used cellophane/angelina film to make wings, and essentially this is the same principal. In theory .
Only this time I used crape paper instead so that I could paint it and get the colour exactly as I wanted it!
I
started by making wire armatures of the fins, out of some thin floral wires. I
twisted the ends of the wires together and glued the resulting product in between two sheets of my crape paper
(it is the kind sold in the gift wrapping department).
I
waited for the glue to dry COMPLETELY. If you try and paint it before
it is dry the paper tears and there is no recovery from that, trust me!
In
this case I used some blue and green shades of a lovely metallic water
colour paint that I found at Spotlight (one of the biggest "DIY/general craft"
store franchises Down Under).

I love the effect of the metallic sheen in the water colours.

This is the paint pallet I bought.

Here are my two fins, painted and drying...

Once they were dry, I added some fine cosmetic glitter accents, and secured them onto my little baby.
To do so I simply cut the original armature wires as short as I could (I had left them long until I was positive that I wouldn't need them), then I bent the twisted parts of the fin wires and poked that into the end of the doll's tail, with the aid of some added clay.

I baked this with my heat gun (paper and ovens don't really work well together...)

Here is a view from the top.

To finish the tail, I used some trusty old TLS and painted it over the whole of the tip , and even some onto the fins themselves, By doing this it helps the fins look like they are a part of the doll, and not just something extra stuck on there...

The paining of the tail was done using the same colour range as I did for the fins.
I will tell you that it took a lot of time and patience (I painted on and allowed to dry a single coat at a time and, what with my brilliant idea of using water colours, it took almost as long as forever!), but the end result was definitely worth it.

When I was happy with the base colours, I moved on to adding some accents by way of micro-beads and glitter (technically my hubby has banned glitter from our house, but I just wait until he isn't paying attention to play with it, so shhhh!)

Here are just a few additional shots of the tail from all different angles.

See how that TLS helped seal in the fins nicely?


About here I found that I am a little tired of seeing her bald, so I think it is time for some hair.
I used this Viscose hair from OOAK Artist Emporuim. I love them.
Okay, being an American based company, the stuff takes a little while to get here, and the shipping can be a little pricey, but the products are amazing and a LOT more affordable (even with the exchange rate and shipping) than what I have been able to find it for here in Australia...
(Here is a link if you are interested: http://www.ooakartistemporium.com/DollHair.html)
Moving on. I separate the strands of 'hair' (I believe that it is actually made from bamboo and is not in fact hair as we know it) and glue them into wefts like these. I make way more than two, but I just didn't photograph them.
I leave them to dry, undisturbed, for at least 2 hrs.

Once they are dry I gently pull up the glue and cut away the top bit to make a clean, straight line.

Like this.

Then it is simply a matter of finding the right little hair piece to fit in the right spot, making sure that there are no empty/bald spots left when you are done.

A bit of styling and some creative glueing and she is good to go.
I realize only now that I have not got any photos of her getting her face painted either!! It really isn't much, just a few drops of a subtle burnt umber for eyebrows and a few lashes and just a touch of peach for her lips.
And that's that for the sculpting!

To make her little base I simply took a circular wooden disc and glued on some craft sand. Once the glue for that had dried, I fixed Amber onto the base as well, again using some glue. Finally I went digging around in my bowl of stones and crystals and selected a bunch that I also, in turn, glued in place.


And there you have it.
As always, feel free to comment and criticize. (I promise I can take it, I'm a big girl.) Also if you have any questions, feel free to ask.
Until next time!
ACL.
PS I have been using a new communications platform, and if you are interested in contacting me with questions and/ or comments, find me instantly (messages are sent to my phone) here:
PS I have been using a new communications platform, and if you are interested in contacting me with questions and/ or comments, find me instantly (messages are sent to my phone) here:
https://reaches.me:8443/urlchat.html?guestid=6aa28459a91aad02692a9334f633919a
Its
a fairly unique platform with a huge range of uses, but I like the
chat. Alternatively, download it form the PlayStore. Search for
chatWORLD or follow this link: https://play.google.com/store/apps/details?id=com.world.chatworld&hl=en